Table of Contents
Nx Workspace Introduction
To make developer’s work easier, there are many tools and technologies available in the market. Angular is a leading platform to make mobile and desktop web applications. Angular provides wasp APIs and functionalities to work with which makes web development easy. Although angular provides lots of functionalities, it can be improved by some other frameworks to make angular more efficient.
Nx workspace is one of the best frameworks to make angular easier and faster. After following this blog we will get a basic idea about what nx workspace is? Why do we need nx workspace? how to use it? how to use it with angular? So, let’s first start with what is nx workspace?
Nx Workspace – Definition
Nx workspace is a tool that manages our monorepo and helps to build and architect. Nx is extensible and has fully integrated support for other tools like a jest, cypress, storybook, etc. Nx workspace can work at any scale of monorepo. Nx also has vast support for frontend frameworks.
Monorepo contains different apps into a single repository. We will discuss it later in the blog. Now let’s see why we need to use nx in our app.
Nx provides a framework to build, develop, test & scale our application and gives us good flexibility with its cloud.
Why use Nx Workspace
As nx provides a good framework for our angular application, it seems to take lots of resources and time to process functions. Well, it’s not.
Nx wrap core of angular framework and its cli to make it a better experience for users. It provides better linting, testing, faster cli, and good support for popular libraries and tools. Nx makes your experience fast
with the help of graph-based task execution and computation caching.
Computation caching
Nx uses Computation caching That is if someone has already built or tested a similar code nx will use that result which makes our process faster. We can use cloud configuration to make this function more efficient and fast.
graph-based execution
With graph-based execution method nx checks for any code changes in our app and performs build for that changes. Nx divides commands into the graph of smaller tasks so that nx can run those tasks parallelly and make processes faster nx can also distribute those tasks to other machines without any configuration.
With a combination of these two technologies, nx will check for any new commands or executable/ updated files to process. If nx would not find any changes then nx will get results from the previous run. With the help of the cloud, you can configure many other members’ results and make testing or building even faster.
Nx is facilitated with:
- Rich plugin ecosystem
- Distributed Graph-Based Task Executions and Computation Caching
Monorepo
Monorepo is a single repository that stores multiple application libraries and their dependencies for providing better code sharing and faster building & testing. Monorepo is a collection of code So why not use a simple code collection? Because
Monorepo provides us:
- Cose sharing and visibility
- Automatic changes
- Mobility for developer
- Managing all the dependencies with a single set
And also simple code collection will cause :
- Unnecessary repetition of testing
- Code can be messy
- Different tooling for every project
With monorepo, we can control code sharing and can have an accurate Architecture Diagram
Example: Nx Demo App
Let’s see how to use these awesome functionalities of nx in our application. For using nx functions in your application you have to create an nx workspace. To add nx workspace follow these steps.
Prerequisites
- angular/cli (recommended : 12.1.1)
- Node (recommended : 12.19.0)
- Npm (recommended : 6.14.8)
Add nx in your application
Nx will wrap your angular cli with nx/cli. nx/cli will enhance angular/cli with rich functionalities. Nx also provides commands for generation, execution, and understanding of codebase. I have provided some of these commands at the end of this document. Start with creating an application.
Step-1: Create your nx application
There are two ways to create your application.
1.1 Add nx to the app that has already been created
If your angular application is already created then you can create an nx app by running this command :
npx make-angular-cli-fasterAnd to completely transfer your repo in the nx workspace run this command:
ng add @nrwl/workspace1.2 Start with nx from scratch
You are creating nx workspace without angular project you can create nx workspace by running this command :
npx create-nx-workspace --preset=angularYou will see some prompts in the command line and the preset select angular.
This command will create two projects.
- an angular application
- an e2e test for our application.
You can serve your nx application with the nx serve command
nx serve <your application name>Step-2 Add some tests in e2e
Let’s run a simple example for a better understanding of the test:
Make some method to test in your component
import { Component } from '@angular/core';interface Wish { title: string; }
@Component({ selector: 'demo-nx-root', templateUrl: './app.component.html', styleUrls: ['./app.component.css'], }) export class AppComponent { list: Wish[] = [{ title: 'Wish 1' }, { title: 'Wish 2' }]; addWish(wish: any) { this.list.push({ title: wish, }); } }
Write some tests for methods and use nx to run tests with ease.
Nx provides an automatic test environment for our application. By default, nx uses cypress as a testing tool. You can use other than cypress as a testing tool. But, for this demo, let’s continue with cypress.
Start with app.po.ts file in our e2e environment demo-nx/apps/demo-nx-e2e/src/support/app.po.ts
And create helpers for our test case.
export const getWish = () => cy.get('li.list');
export const getAddWishButton = () => cy.get('button#add-wish');
After that update the test file with this code. Your test file is in e2e demo-nx/apps/demo-nx-e2e/src/integration/app.spec.ts
import { getAddWishButton, getWish } from '../support/app.po';
describe('TodoApps', () => {
 beforeEach(() => cy.visit('/'));
 it('should display todos', () => {
   getWish().should((t) => expect(t.length).equal(2));
   getAddWishButton().click();
   getWish().should((t) => expect(t.length).equal(3));
 });
});
The test case is done. Now let’s run this test case.
Step-3 Run test using nx
If your app is running (with nx serve) stop your app and run the app with a test environment with
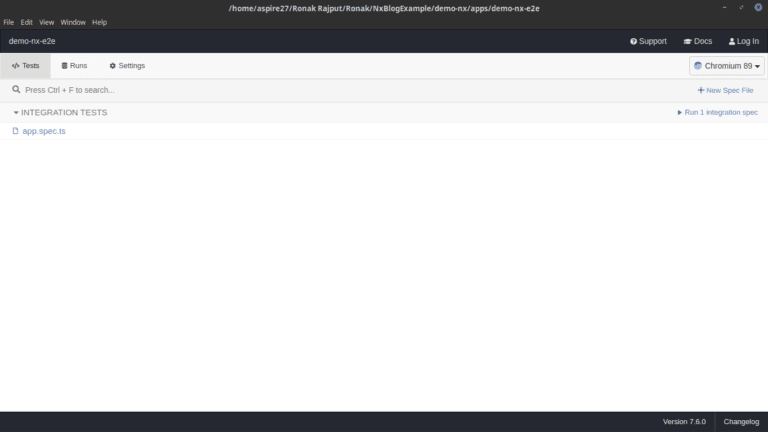
npx nx e2e demo-nx-e2e --watchcommand. With executing this command the bellowed UI will open. This UIAPIstains all the test files in our application.
You can do testing for a complete application or you can test for a single component.

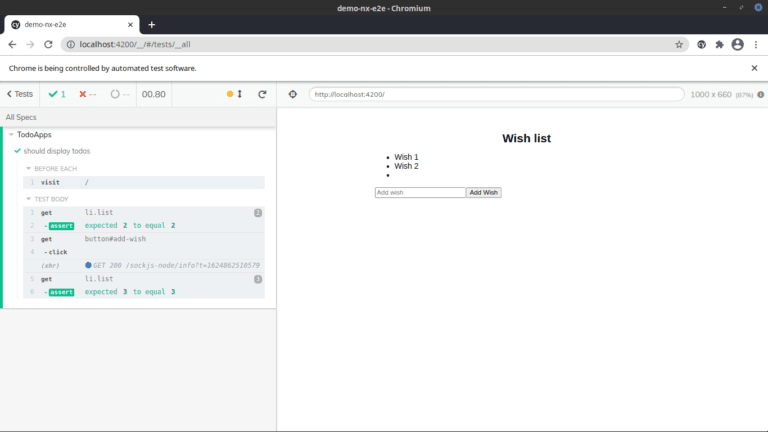
In our case there is only one test file, Select that test file and one automated test tool will pop out and you can see your test result along with your dom model. Here is how this window will look.

With this testing tool, you can run automatic testing and track the failure with this tool.
Step-4 Retrieve data with APIs
Real-world applications retrieve data from APIs. Create simple APIs for your app and update your service files with APIs. Use a local data server for APIs or you can create a node server. Nx makes it simple to add a node in your application with its cli and commands.
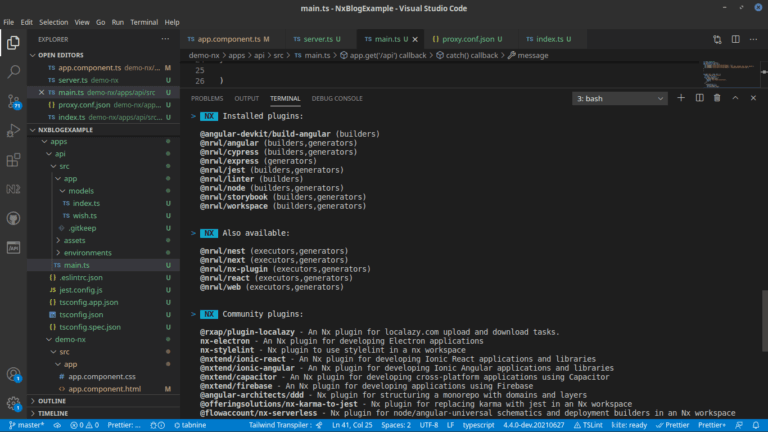
Create a node environment with nx. Nx can support express and many more plugins. Check plugins by running the command nx list. This will list different installed & available plugins which are compatible with nx.
4.1 Add node application with Nx
Creating node applications is easier with nx. Start with checking if express is already installed in your app with nx list command.

In the image above you can see that there is @nrwl/express listed under installed plugins. Run the following command if express is not listed in installed plugins.
npm install --save-dev @nrwl/expressAfter installing express in your application create a node app using this command
npx nx g @nrwl/express:app api --frontendProject=demo-nxThis will create a backend project for your frontend project demo-nx.
In this node, the app creates a backend suitable for your frontend. Add services for retrieving data from the database. You can add controllers for communication between services and routes.
Step-5 Run node app with nx
Run your node app with a simple command npx nx serve api.

This will start your backend. And it’ll watch your backend for any changes.
Step-6 Use advanced functionalities to make your work easy.
Nx provides lots of support for advanced functions.The dependency graph helps you to understand the flow between different projects in our monorepo.
nx dep-graph
nx dep-graph --watch
nx affected:dep-graph
nx dep-graph will generate a dependency graph. You can see it in your web browser and you can filter it with a project you want. Use –watch to update the real-time graph.
nx affected:dep-graph will update only the affected part of your project.
Update plugins
nx migrate latestUse the given command to update plugins in your project.
Build an app with nx
nx run buildBy running this command you can build your app for the first time. The second time when you run this command without making any changes to your code, nx will load the previous result with the help of computational caching.
Run the given command to build only the affected part of your project.
nx affected --target=buildAdvantages
- Working with a monorepo will help to manage a single package.json file for all the projects.
- With comp-caching nx improves the speed and performance of projects.
- It provides good support for cli commands that can provide lots of functionality than angular cli.
- Codesharing is way much easier with a single repository.
- Nx makes Routing and state management easy to manage.
Reference:
For more deep information about nx refer to its documentation: https://nx.dev/latest/angular/getting-started/intro
Aspire Portfolio:
Visit our Aspire Portfolio Section for all the Front-end UI-UX Projects.
Aspire Softserv has expertise in many trending technologies like Liferay, Java, Angular, React, ASP.NET, and many more. For more information visit our service page.
If you have any queries, feel free to contact us. We look forward to working with you. Have a great day 🙂
About Aspire Softserv
Aspire Softserv has expertise in many trending technologies like Liferay, Java, Angular, React Native, Blockchain, and many more. For more information visit our service page.
Still Have Any Questions and Confusions
Contact us If you have any questions, doubts, or ideas, feel free to contact us. We look forward to working with you. Have a great day.
If you have any App or Website ideas or want to start or upgrade your online business.
Don’t worry. Click the contact button below. Discuss any kinds of queries about your business.
See you in chat. Don’t forget to give feedback.


