


Abstract:
To Implement the communication bridge between windows form application (running as a server) and android application (running as a client) running on the local network.
Enter Messaging Framework:
In this Blog, we are showing that how Eneter Messaging Framework is working and how we can use this to communicate.
Eneter Messaging Framework is a lightweight framework for interprocess communication.
It is easy to use and it works across various platforms.
The framework provides communication components that you can use to create various communication scenarios.
Below Graph shows the Communication between Android and Windows Application using Eneter Messaging Framework.
android-dotnet 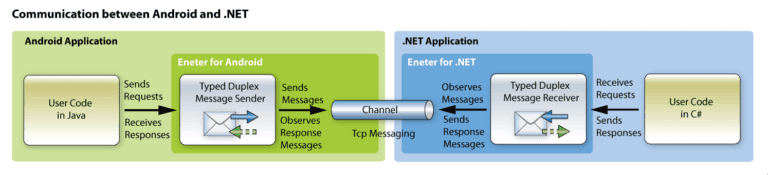
To establish Connection between two applications, the Eneter Messaging Framework is use several protocols and Transportation mechanisms Like TCP, HTTP, UDP, WebSocket etc.
Types of Sending-Receiving Messages:
String Messages
Typed Messages
Remote Procedure Calls.
Features:
Reliability:
The communication must be promising and Reliable. It Provides Monitoring of connection availability, Buffered messaging and automatic reconnect.
Security:
Communication across the network is easy to observe and confidential data can be acquired by Unauthorized Persons. Therefore, you may have to protect your data by using Authenticated connection, Encrypted Messages, and SSL.
Steps to establish the communication between Windows Form and Android Application using TCP
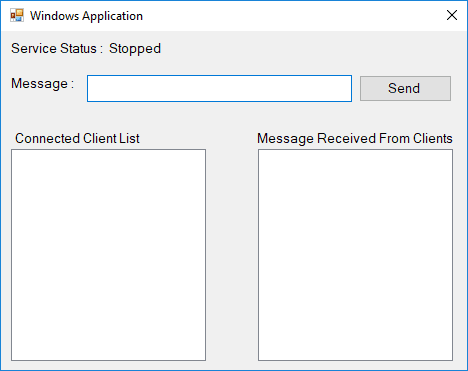
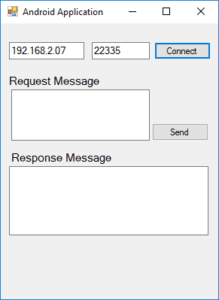
Create a simple Window Application in C# and Android application in Xamarin which is able to send and receive a message as shown in below images And Install Eneter Messaging framework library to both applications using Manage NuGet Packages.
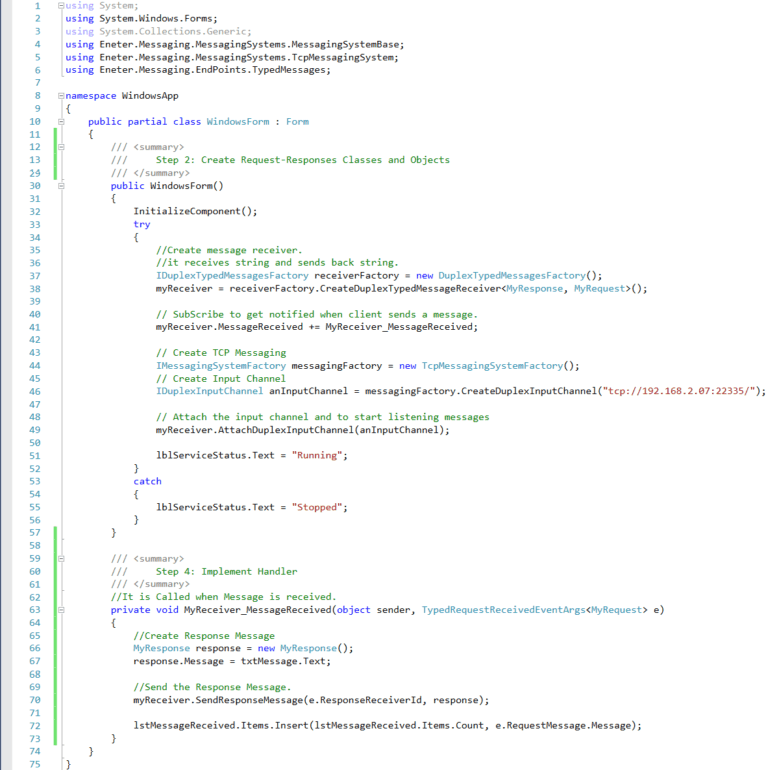
Step 1: In the code page of windows form in which you are designing, create properties to Send/Receive Messages and then, Create Object of Receiver. Sender-Receiver Request/Response Can be of any type like String, integer, Boolean, Class. Here, we are Creating Request-Response Class and declare Message Property in it.
Step 2: To Implement a Communication, need to create a service on the server. Service includes the creation of Receiver object, input channel and attachment of the input channel to the receiver. To Create and Start a service on a local machine which is acting as a server please follow the below steps:
Create Message Receiver and Subscribe Handler to Handle Message and Then, Create Input channel to Receive the Messages from the client and Send response Messages to the client.
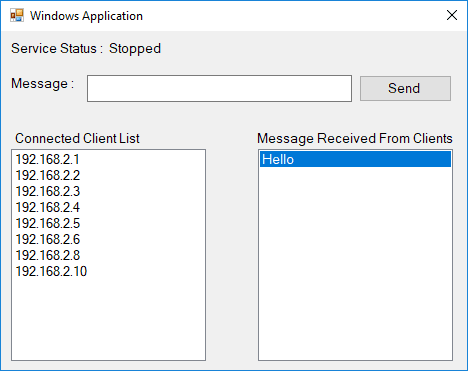
The server is receiving the message from the client as well as send the response messages to the client. Clients which want to communicate with windows application are needed to be connected to the server. More than one client can connect to the server at a time.
Step 3: Implement the Event Handler, which is automatically called whenever the messages are received. It accepts the request messages and gives a response to that messages. We can see the Receive messages of the client in “Message Received from Client” List.
TCP Connection in Android Application:
When you implement communication via TCP on Android devices. There are two things that you have to care about which is mentioned as below.
INTERNET Permission must be set on Android Application.
You can’t set 127.0.0.1 (loopback) IP Address on Android emulator to communicate with the DotNet Application.
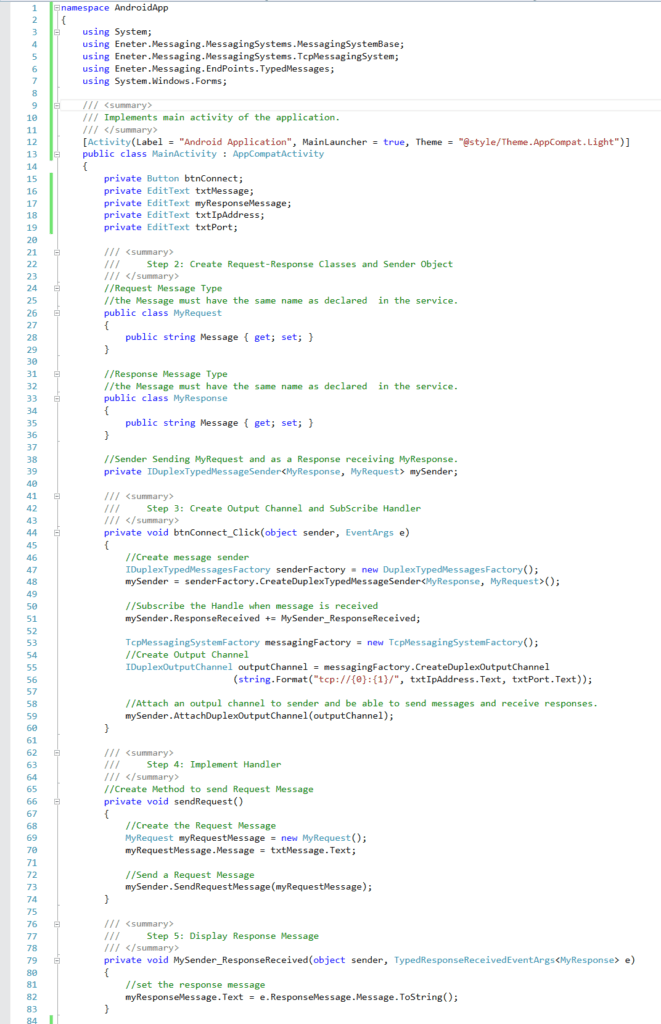
Step 1: The Sender and Receiver must be having the same type and format. In the MainActivity.cs file, Create Request and Response Classes and declare message property into it. Create a Sender which used to send the Request message of a Request message type.
Step 2: To Create Connection to the Server in which service is running please follow the below steps:
Create Message Sender and Subscribe Handler to Handle Message and Then, Create and Attach Output channel to the Server IP Address and Port number.
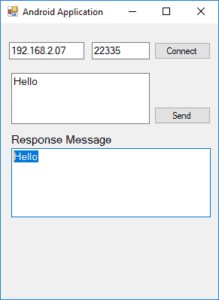
Step 3: After connecting to the server, We Can Send the Request message to the server which is displayed in “Message Received from Clients” List at Windows Application. Then, Server sends the Response message to the client after receiving the Request message from the client.
Step 4: Implement Handler to Handle the Response Message sent by Server. The client is received the Response Message using the output channel. The subscribe handler is automatically executed when it receives a message from the server and it displays the message in the “Response message” box.
Conclusion
In our ever-connected world, the seamless communication between diverse devices stands as an imperative. The interaction between Windows and Android devices has gained paramount significance, given the dominance of these operating systems in their respective platforms. The good news is that various methods and technologies are at your disposal, facilitating effortless connectivity and data exchange between these two ecosystems.
Ready to enhance the synergy between your Windows and Android devices? Explore the myriad methods and technologies available for seamless connectivity. Streamline your data exchange processes and experience the full potential of this intercommunication. Elevate your device experience today!
For personalized guidance and solutions tailored to your unique needs, don't hesitate to Contact us today. Empower your devices with seamless connectivity – reach out to our expert team at [email protected] . Let's unlock the full potential of your Windows and Android devices together. Elevate your connectivity game with AspireSoftserv – where innovation meets seamless integration!


